Confused about proxy configuration? This in-depth guide unravels the complexities of setting up proxies, discover the steps involved, common issues, and expert tips for configuring proxies on various
Feeling restricted online? Want to browse anonymously, access geo-blocked content, or simply experience faster loading times? WiFi proxies are your secret weapon! This guide dives deep into the world of proxies, explaining what they are, how they work, and how to choose the perfect one for your needs.
What is a WiFi Proxy?
A WiFi proxy is a server that acts as an intermediary between your device and the internet when you're connected to a WiFi network. It intercepts your internet traffic, routes it through its own servers, and then delivers the requested content back to you. This process can provide several benefits, including:
Increased privacy: By masking your IP address with the proxy's IP address, you can browse the internet anonymously, making it more difficult for websites to track your online activity.
Enhanced security: Proxies can filter out malicious content and protect you from phishing attacks and other online threats.
Bypassing geo-restrictions: If a website is blocked in your region, you can use a proxy server located in another country to access it.
Faster browsing: Some proxies can cache frequently accessed content, which can speed up your browsing experience.
How Does a WiFi Proxy Work?
When you connect to a WiFi network and enable the proxy settings on your device, all your internet traffic will be directed through the proxy server. Here's a simplified explanation of how it works:
Request: You send a request to a website or online service.
Interception: The proxy server intercepts your request and checks if it has the requested content cached.
Caching: If the content is cached, the proxy server delivers it to you directly, saving you time and bandwidth.
Forwarding: If the content is not cached, the proxy server forwards your request to the actual website or service.
Response: The website or service sends the requested content back to the proxy server.
Delivery: The proxy server receives the content and delivers it to your device.
How to Choose the Right Proxy Server: A Guide for Everyone
Before diving in, identify your proxy goals. Do you prioritize anonymity, security, bypassing geo-restrictions, or something else? This focus will guide your choice towards the perfect proxy type.
Increased Privacy:
If you want to browse anonymously (without websites tracking your activity): Choose an "Anonymous Proxy" or "High-Anonymous Proxy". These hide your IP address and don't reveal that you're using a proxy.
Types of Proxies Based on Anonymity Level
Transparent Proxy: Doesn't hide the client's IP address or proxy usage.
Anonymous Proxy: Hides the client's IP address but reveals that a proxy is being used.
Elite/High-Anonymous Proxy: Hides both the client's IP address and proxy usage.
Enhanced Security:
If you're concerned about malware and online threats: Opt for an "HTTPS Proxy" which encrypts your traffic for added security between you and the proxy.
Types of Proxies Based on Protocol
HTTP Proxy: Handles HTTP traffic and is commonly used for web browsing.
HTTPS/SSL Proxy: Handles encrypted HTTPS traffic, providing an additional layer of security.
SOCKS Proxy: A general-purpose proxy that can handle various protocols like HTTP, HTTPS, FTP, etc.
Bypassing Geo-restrictions:
If you want to access websites blocked in your location: Consider a "Data Center Proxy" or a "Residential Proxy". Data center proxies offer a wider range of locations, while residential proxies appear more like regular internet users, potentially bypassing restrictions more effectively.
Types of Proxies Based on IP Address
Data Center Proxy: Uses IP addresses from data centers, not affiliated with ISPs.
Residential Proxy: Uses IP addresses from residential internet service providers, appearing as regular users.
Mobile Proxy: Uses IP addresses from mobile networks and devices.
Faster Browsing:
For a potential speed boost: A "Shared Proxy" might be an option. However, keep in mind that shared proxies are used by multiple users, so performance can vary.
Types of Proxies Based on Service
Public Proxy: Free but slow, insecure, and unreliable.
Private/Dedicated Proxy: Paid, faster, more secure, and reliable. Used by a single client.
Shared Proxy: Cheaper than dedicated proxies but shared among multiple clients.
A Summary Table
IP Address
Protocol
Anonymity Level
Service
Traffic Flow
Data Center Proxy
HTTP Proxy
Transparent Proxy
Public Proxy
Forward Proxy
Residential Proxy
HTTPS/SSL Proxy
Anonymous Proxy
Private/Dedicated Proxy
Reverse Proxy
Mobile Proxy
SOCKS Proxy
Elite/High-Anonymous Proxy
Shared Proxy
How to Configure a Proxy?
Whether you're using an iPhone, Android, Windows, or macOS device, our detailed step-by-step guides will empower you to set up a proxy with ease. For detailed instructions on configuring proxies specifically for web browsers, refer to the following resources:
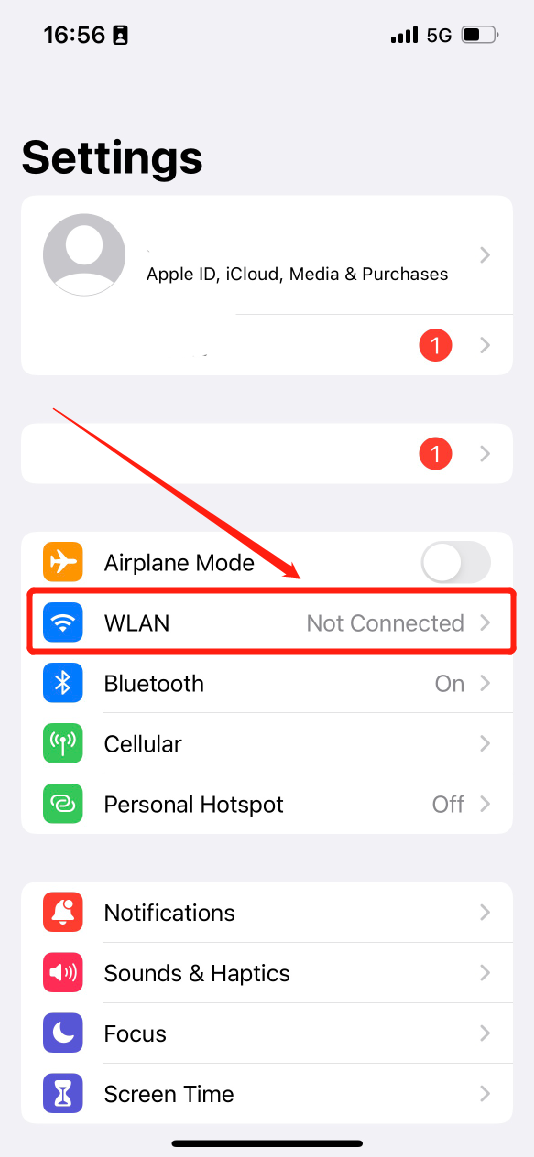
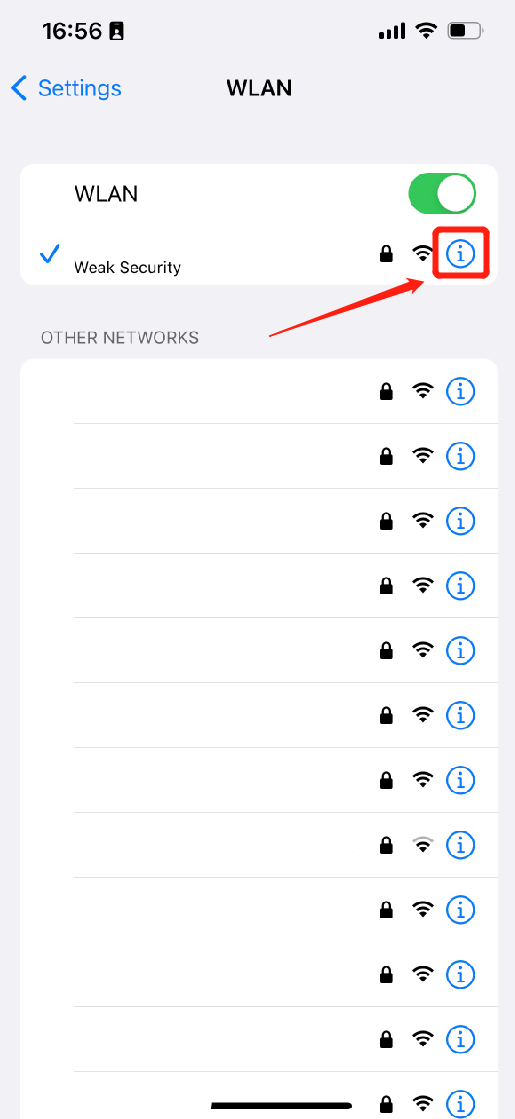
Look for the Wi-Fi network you're currently connected to (it will have a blue checkmark next to it).
Tap the small "i" icon next to the network name.
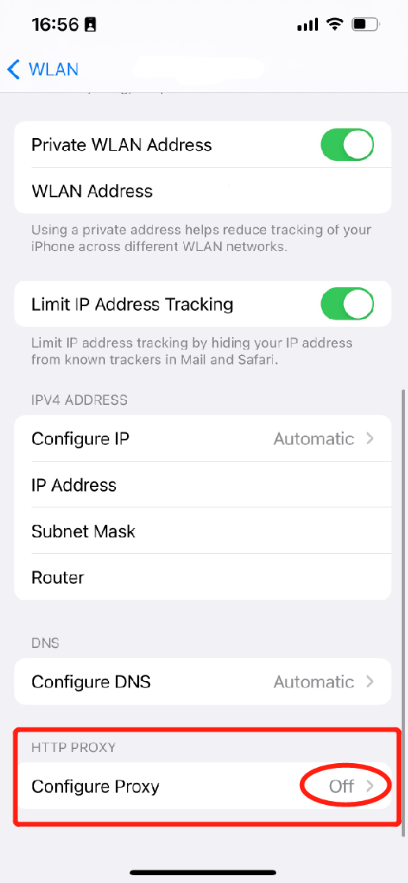
Step 3: Enable Proxy Configuration
Scroll down until you see the "HTTP Proxy" section.
Tap on "Configure Proxy".
By default, it will be set to "Off." Toggle the switch to "On" to activate proxy settings.
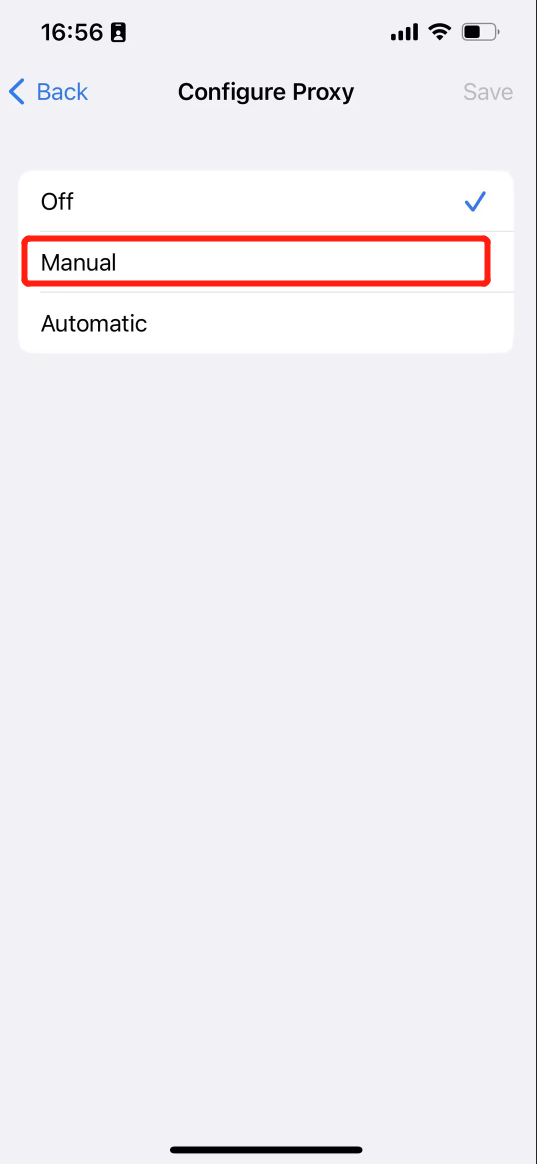
Step 4: Choose Manual Configuration
You'll see two options: "Automatic" and "Manual."
Since most proxy providers require manual setup, choose "Manual".
Step 5: Enter Proxy Details
Now comes the part where you'll need your proxy information.
In the "Server" field, enter the IP address or hostname of your proxy server.
In the "Port" field, enter the port number provided by your proxy provider.
If your proxy requires authentication (username and password), toggle the switch next to "Authentication" to "On".
Fill in the "Username" and "Password" fields with your specific credentials.
Double-check all the information you've entered to ensure accuracy. Once everything is set, your iPhone will use the configured proxy server for your internet connection.
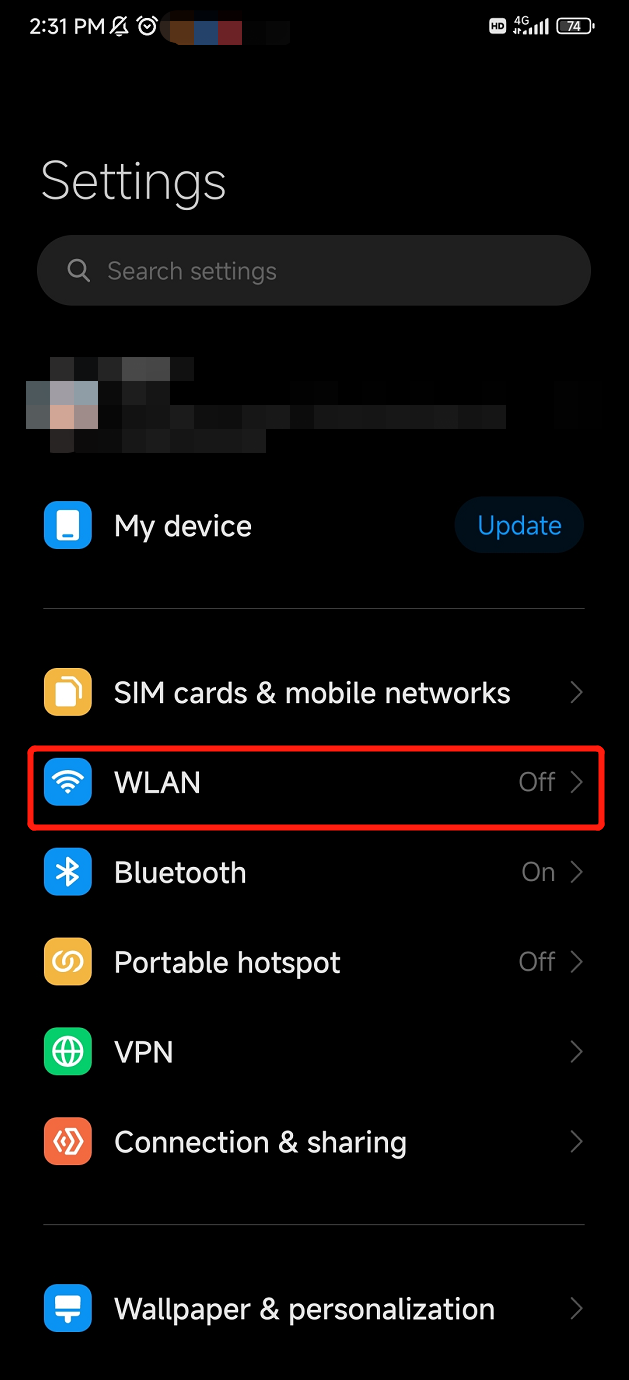
Configure a Proxy on Your Android Device
Step 1: Open Wi-Fi Settings
Head to your phone's Settings app.
Look for the Wi-Fi section and tap on it.
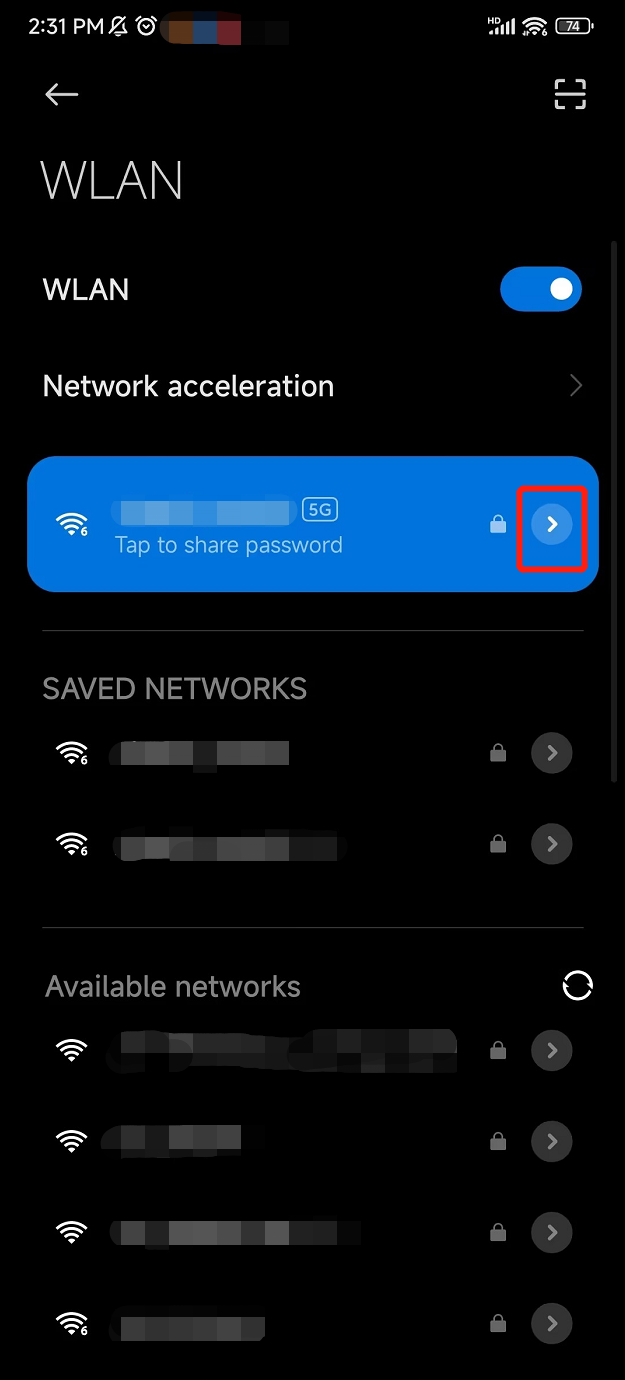
Step 2: Access Connected Wi-Fi Details
Find the Wi-Fi network you're currently connected to (usually displayed with a checkmark).
Tap on the network name to see more details.
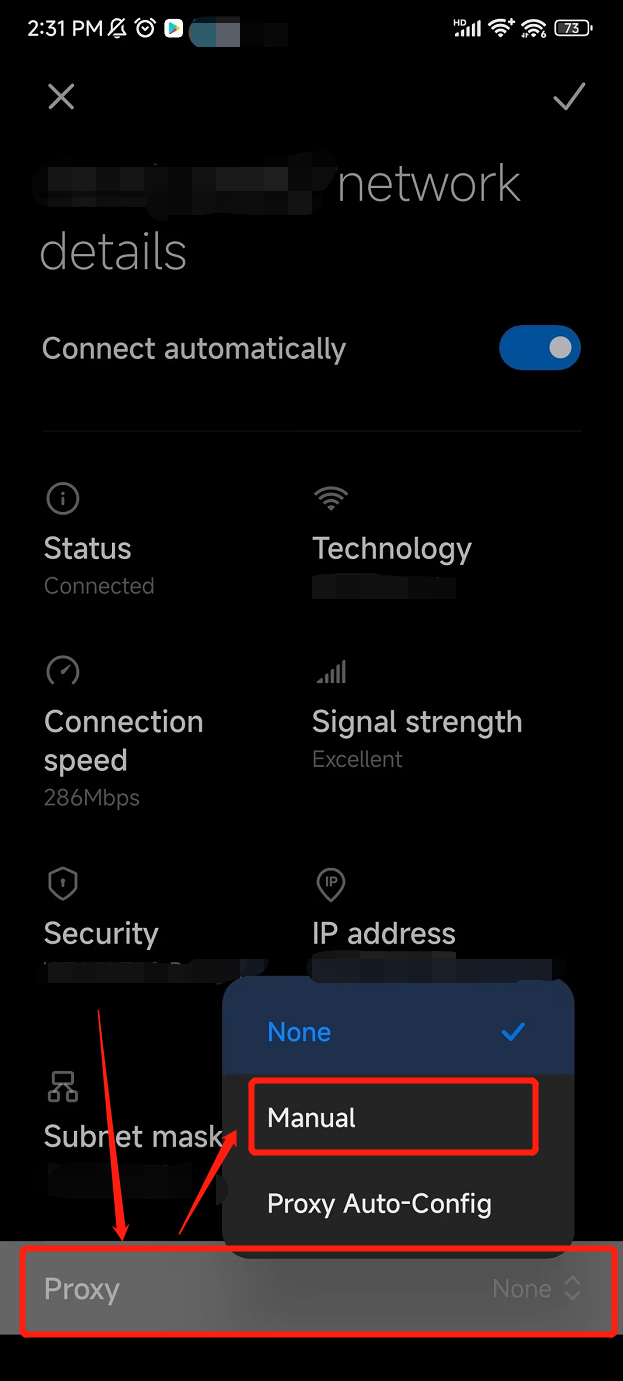
Step 3: Enable Manual Proxy
Scroll down until you find the "Proxy" section.
You'll likely see options like "None", "Proxy Auto-Config", or "Automatic." Choose "Manual" to configure your own proxy server.
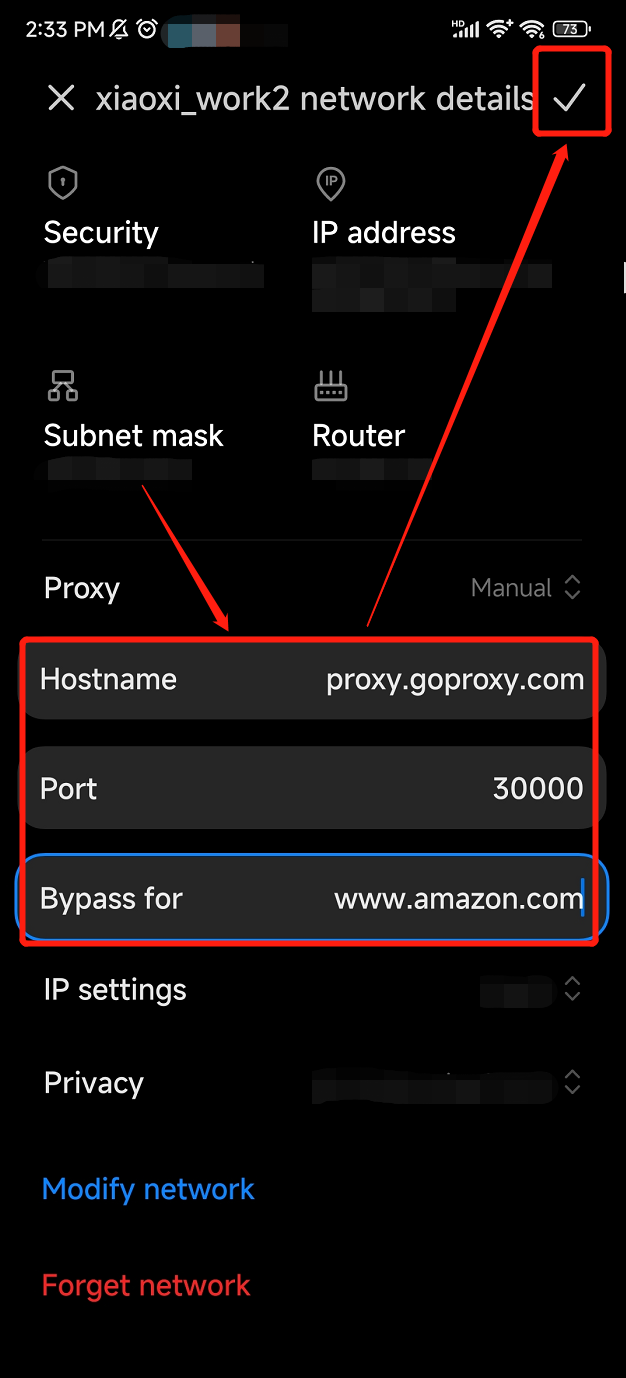
Step 4: Enter Proxy Information
In the "Hostname" field, enter the IP address or hostname of your proxy server.
In the "Port" field, enter the specific port number provided by your proxy provider.
Step 5: Save and Verify
Once you've entered all the information, tap the "Save" button (or similar option depending on your device).
You can use a website like IP lookup tool to check if your IP address has changed to the proxy's IP. This is an optional step to confirm your proxy is working.
Additional Notes
Proxy Authentication: If your proxy requires a username and password (authentication), go back to the Wi-Fi details and tap on "Proxy settings" (or similar). There you should find options to enter your "Username" and "Password".
Configure a Proxy on Windows 10
Step 1: Access Network Settings
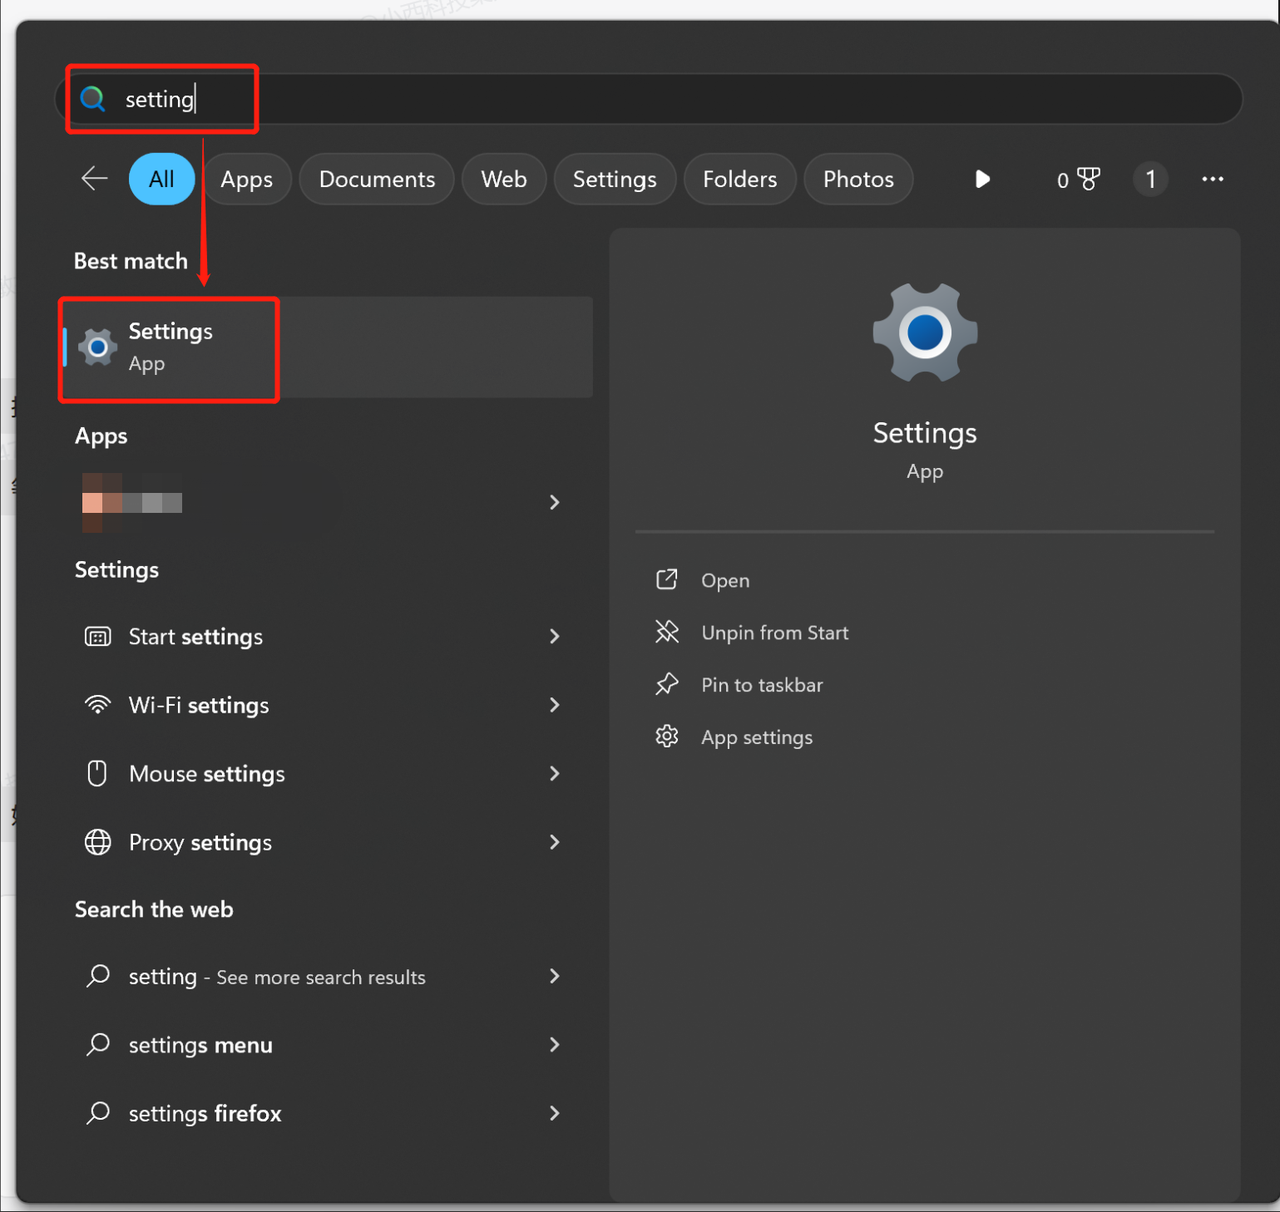
Click on the Windows icon in the bottom left corner of your screen.
In the search bar, type "Settings" and press Enter.
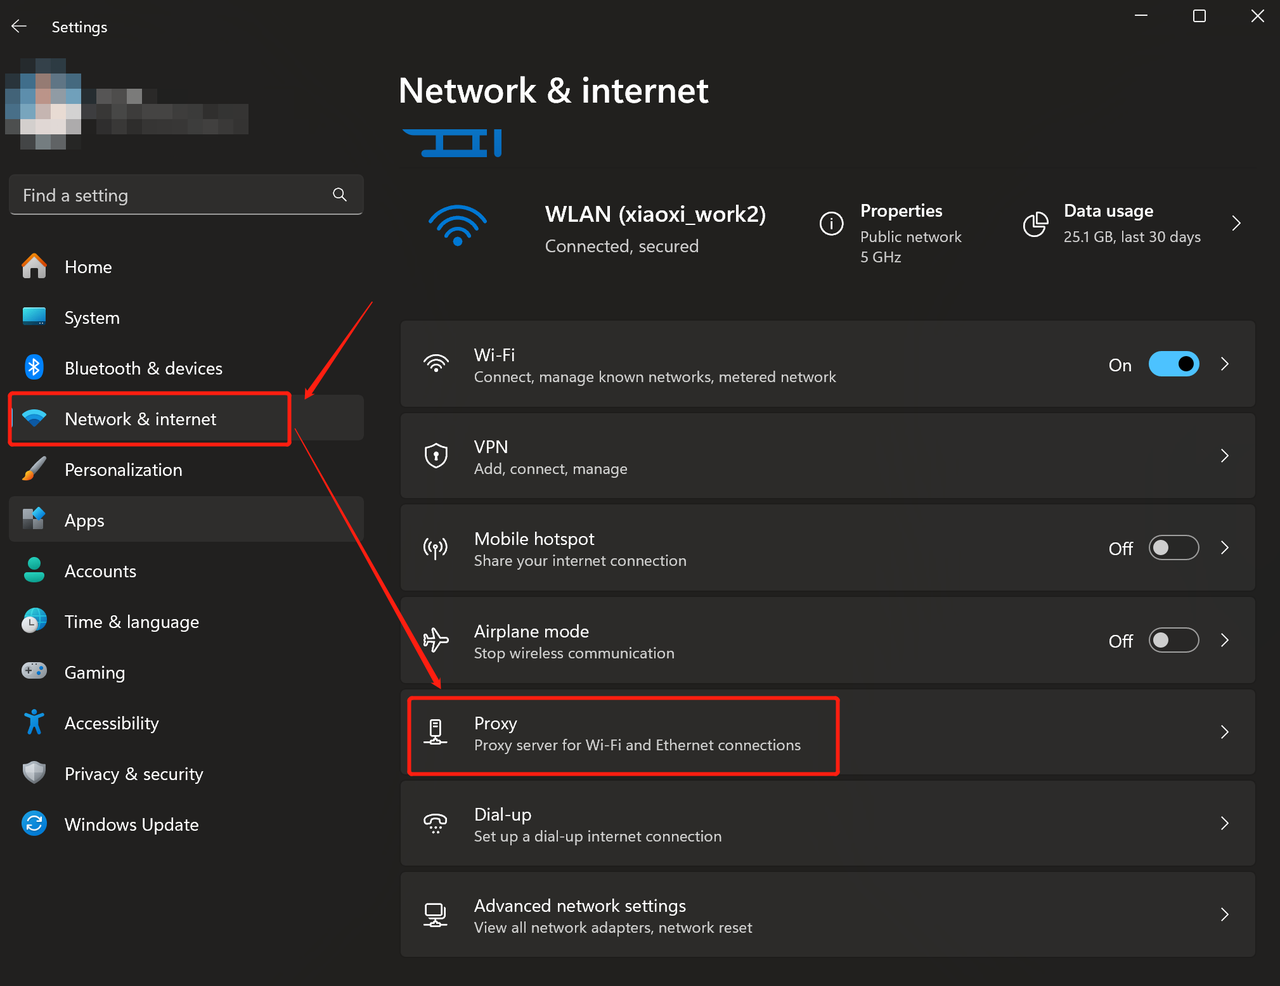
Step 2: Find Proxy Settings
In the Settings window, click on "Network & internet".
On the right-hand side menu, scroll down and click on "Proxy".
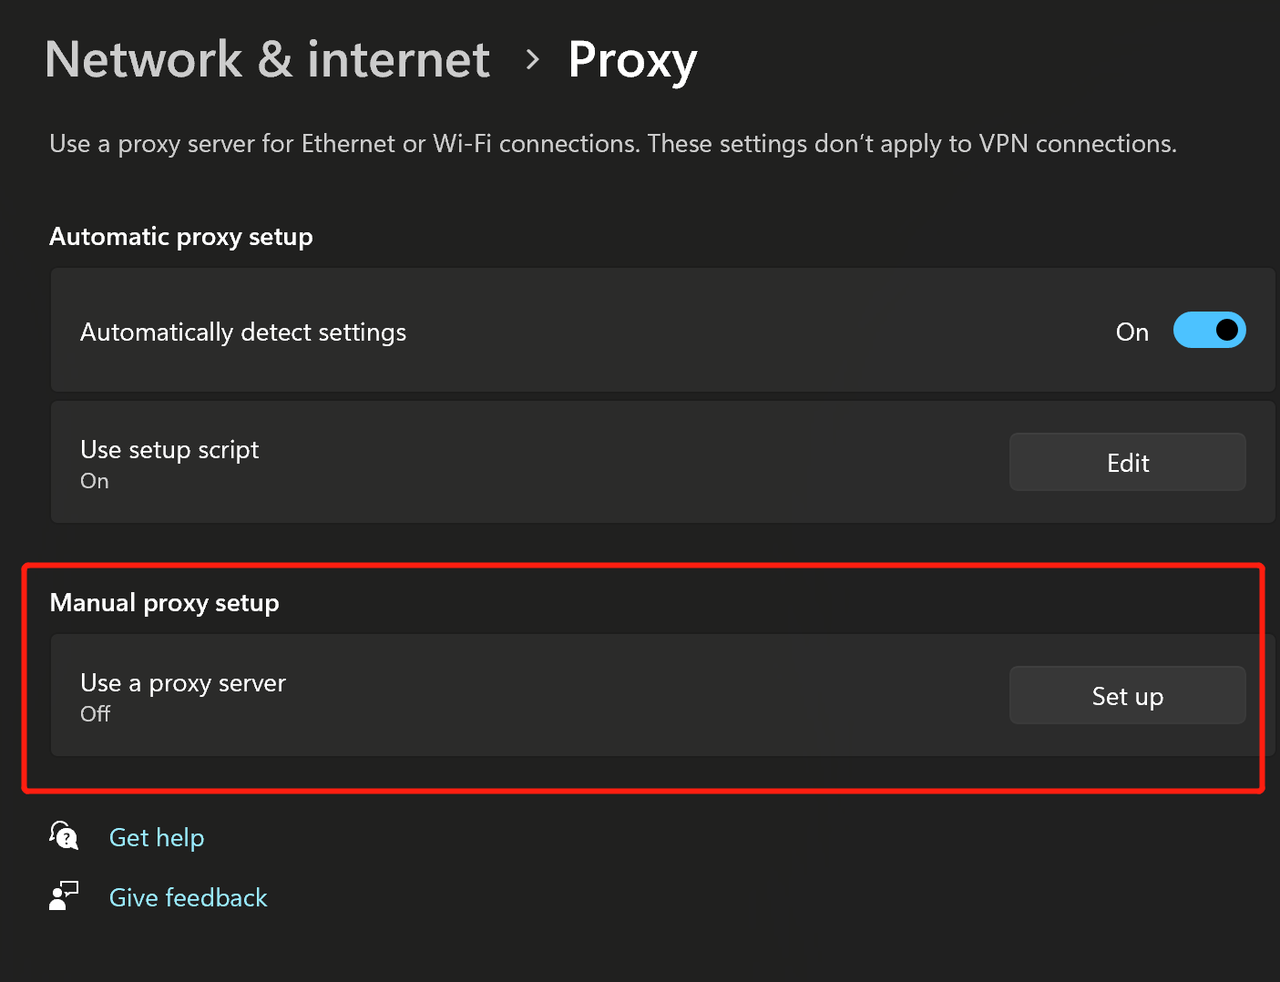
Step 3: Enable Manual Proxy Setup
Under "Manual proxy setup", toggle the switch from "Use a proxy server" to "On".
Step 4: Enter Proxy Details
Now, you'll need the information provided by your proxy provider.
In the "Address" field, enter the IP address or hostname.
In the "Port" field, enter the specific port number.
Click "Save" to apply the proxy settings.
Step 5: Verify and Test (Optional)
Once you've set up your proxy, you can use it to browse websites, download files, etc. If you used username and password authentication, you'll need to enter them when using the proxy.
You can visit an IP lookup website to see if your IP address has changed to the proxy's IP. This confirms that the proxy is working.
Configure a Proxy on MacOS
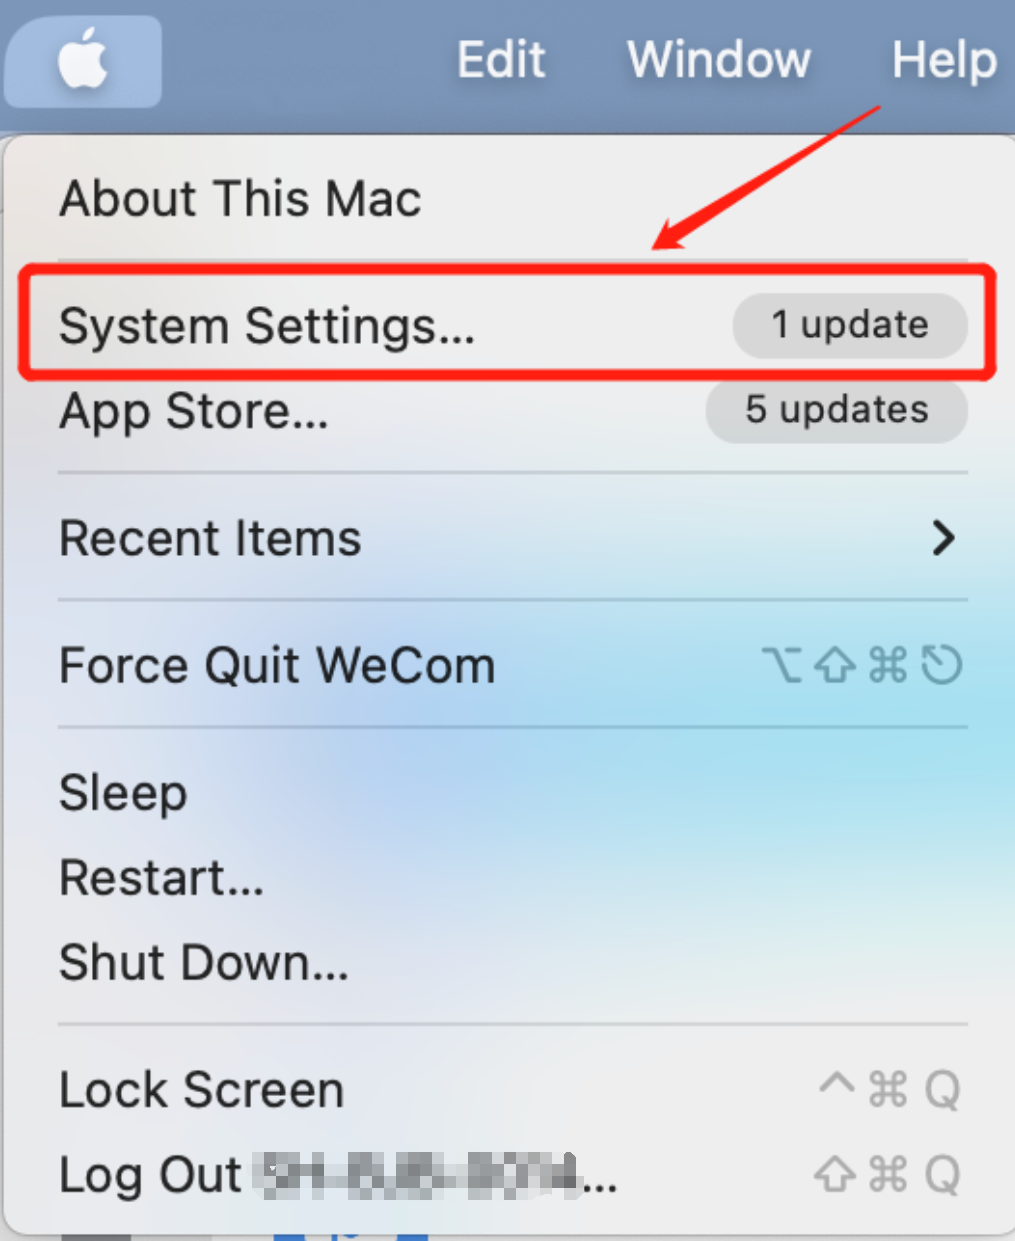
Step 1: Access Network Settings
Click on the Apple logo in the top left corner of your screen.
Select "System Settings" from the dropdown menu.
Step 2: Choose Your Wi-Fi Network
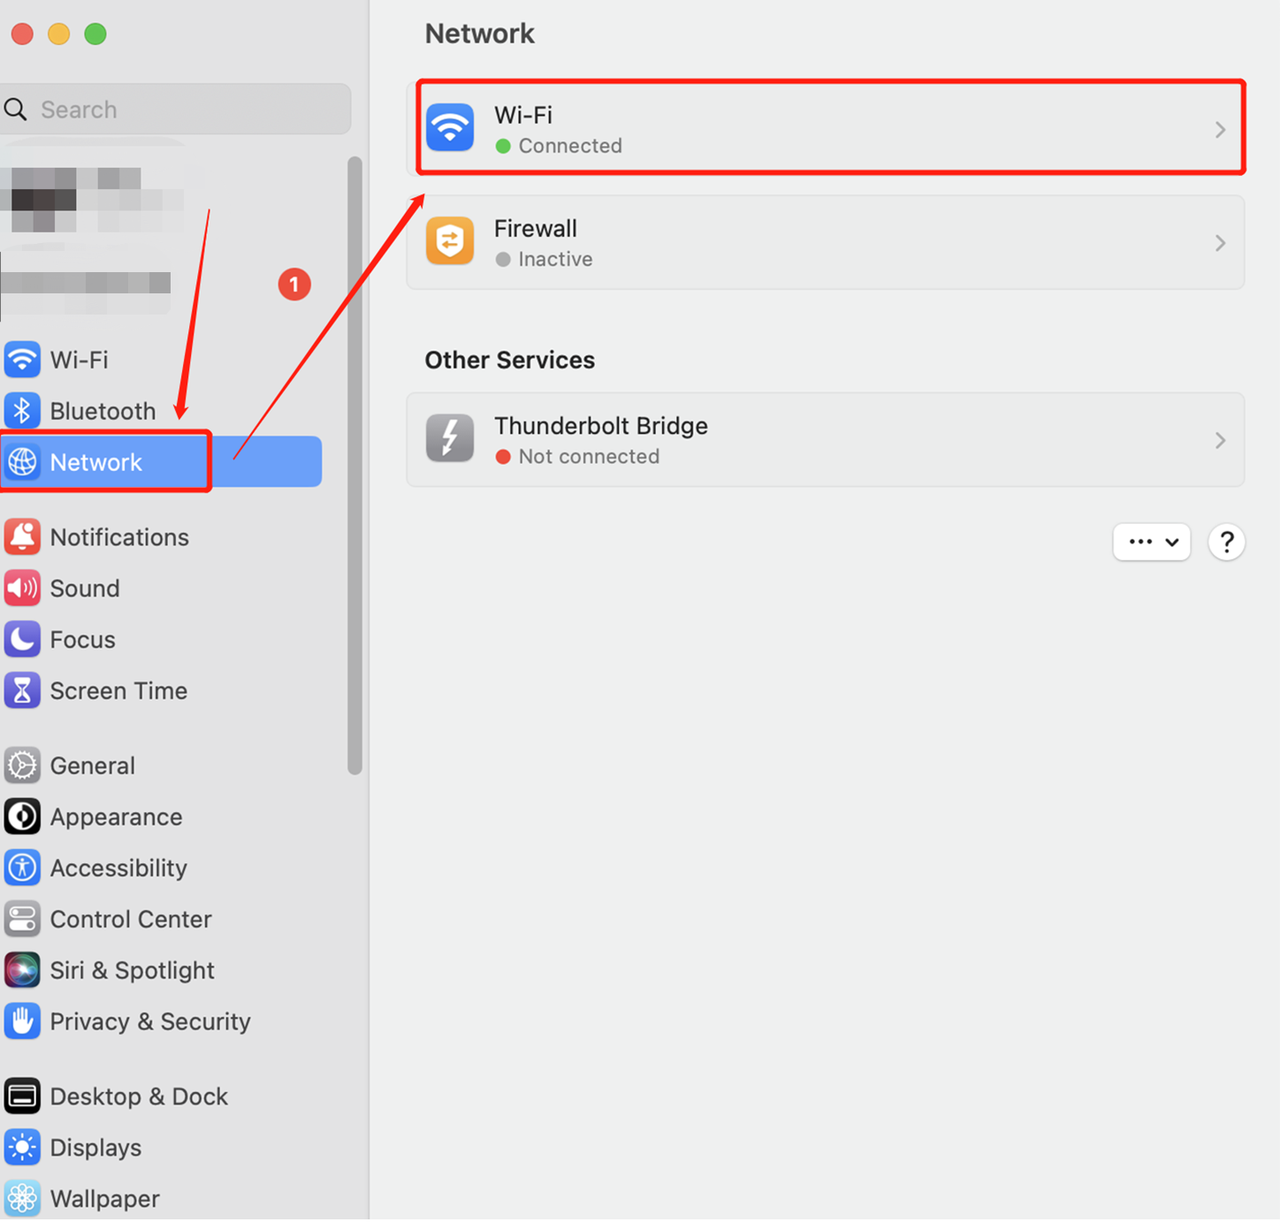
In the System Settings window, click on "Network".
On the right side, select the Wi-Fi network you're currently connected to.
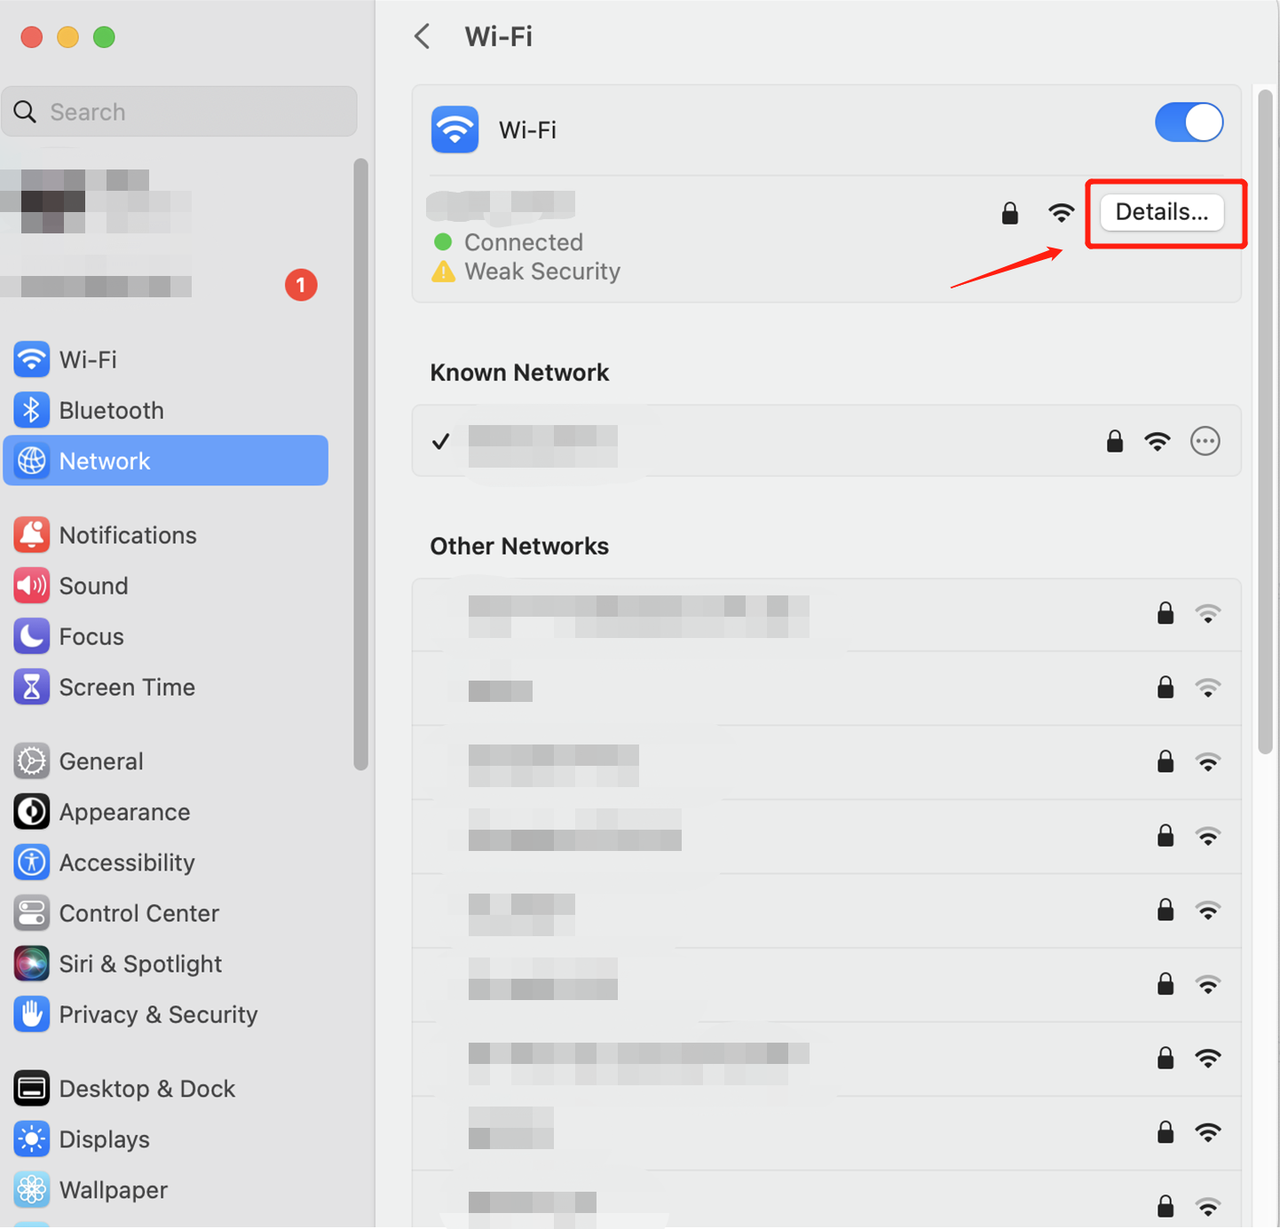
Step 3: Configure Proxy Settings
Click the "Details" button in the bottom right corner.
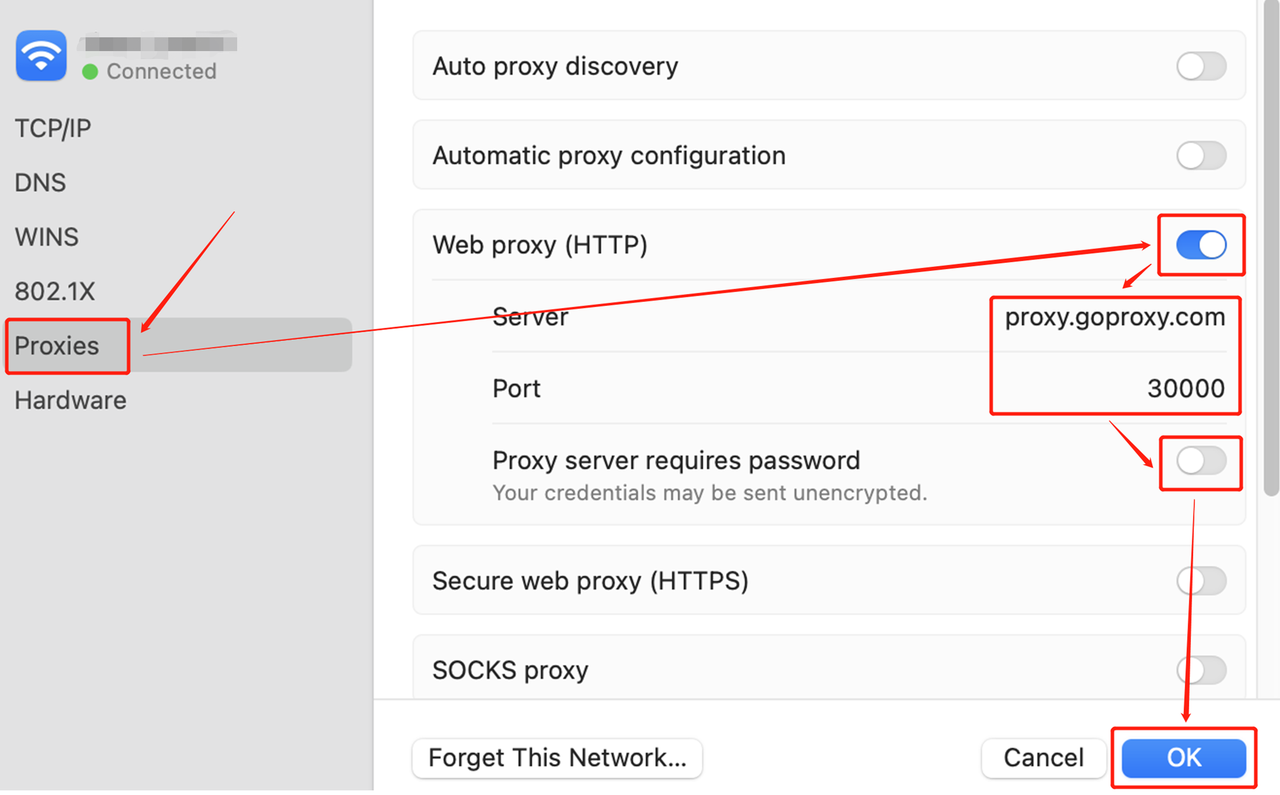
Step 4: Enable and Configure Proxy
Now, click on the "Proxies" tab.
Under the "Web Proxy (HTTP)" section, toggle the switch to "On".
Enter the "Server" address or hostname provided by your proxy provider.
In the "Port" field, enter the specific port number provided by your proxy provider.
Step 5: Enter Authentication Details
If your proxy requires a username and password (authentication), check the box next to "Proxy server requires password".
Enter your "Username" and "Password" in the designated fields.
Click "OK" to save the proxy settings.
Conclusion
By now, you've become a proxy pro! You understand the different types of proxies, how to choose the right one, and even how to configure them on various devices. With this newfound knowledge, you can navigate the online world with greater freedom, security, and efficiency.
< Previous
How to Set Up a Proxy in Dolphin Anti Browser?
Next >
Unlock Real-Time Crypto Insights: Why Every Trader Needs a Telegram Proxy


 Cancel anytime